Here is how to create a new presentation (step by step) – Part 1
Recently I wanted to give our media workshop a full makeover. Not just revise several slides, but completely rebuild things from the bottom up. Let me share the steps I took to do this, as these may come in helpful the next time you’ll be working on a new presentation.
Because this is a more extensive blog post, it will be split up in two parts. In this first part we will work our way to a more or less finished structure in PowerPoint. In part two, you can expect some additional exercises and we will further complete the presentation.
Step 1. Put things on paper and collect information
The first step when creating a new presentation is not to open your laptop and launch PowerPoint. As soon as you do this, you will be pinned down by PowerPoint templates and will be rushed into considering the order of your info and the design. All this whilst not even having a full grasp of what your content will be.
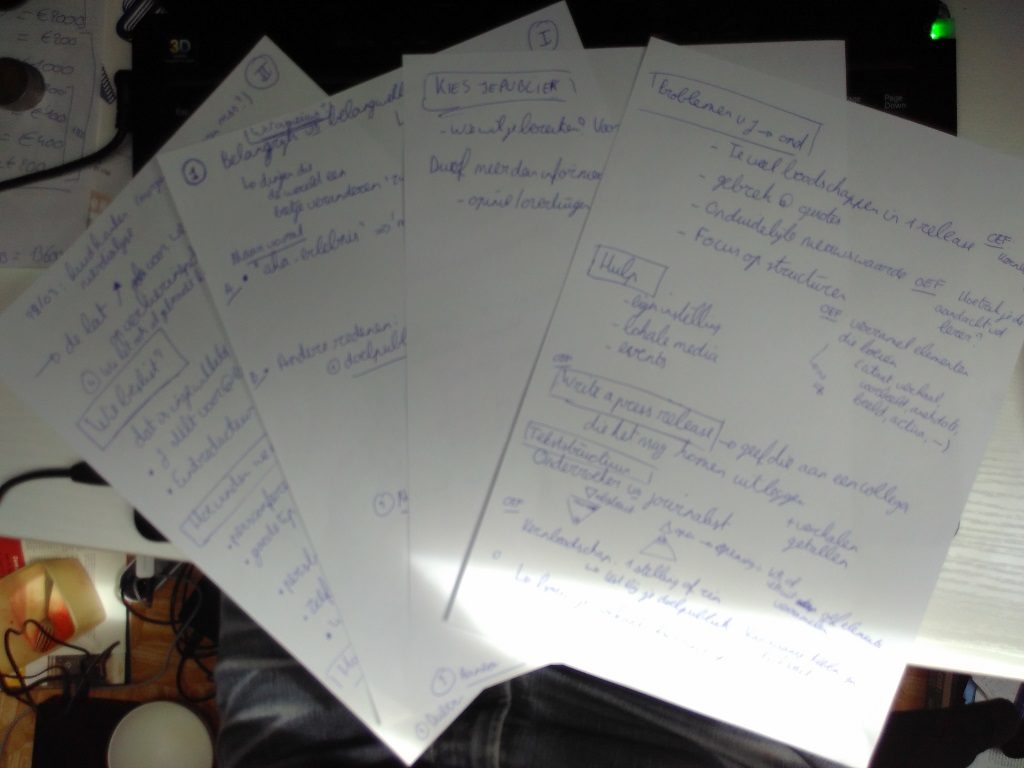
Your first task is to collect information and develop your ideas on paper. In this phase, for me personally, putting things on paper works particularly well: I maintain a clear overview of all the elements I would like to share, and I can always circle back to it all at a later time. This way of working lets you add new ideas or concepts whenever they come to you.
For the media workshop I gathered most of my information from these sources:
- Our previous media workshop and our own book
- The book ‘Schrijven met impact’ (‘writing with impact’) by Ann de Ron
- A lecture by VRT science journalist Koen Wauters on Sound of Science
- A lecture by VRT journalist (and coordinator of Universiteit van Vlaanderen (‘University of Flanders’)) Kathleen Bracke
- A past media workshop developed by my colleague Hans
- My personal experiences as a (science) journalist
By the end of the process, this is what my workshop looked like: a sheet filled with doodles. Once all the remaining information was collected and organized, it was time to launch PowerPoint.
Step 2. Your PowerPoint Structure
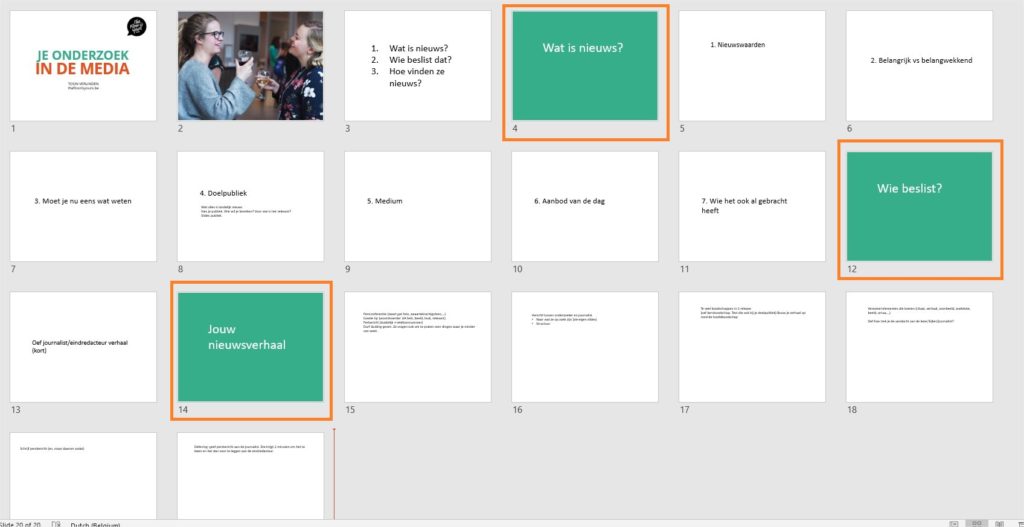
Time now to create a couple of main structure slides. You can refer to your written notes to do this. Don’t worry yet about your final design, word count or including all info, and for now focus only on the structure. At the start of my creation process, the workshop consisted of just the following three parts (the marked slides in the image below):
- What is news?
- Who decides if something ends up in the media?
- How do you create your news story?
Much will still change throughout the entire process, but this is a good start. Behind each green slide I add several slides containing topics that I would like to discuss. This way, everything that I want to touch upon will find a place within the structure I have created.
I am still struggling with my workshop intro story (slide 2). It is a great story that I also use as an opener for the pitch workshop, but I am unsure of it being a good fit for the media workshop.
Step 3 and 4. Fill your structure with information
Now complete the rest of the structure, without worrying yet about the design. My first step was to look for any usable slides from our old media workshop and try to drop those into my current structure (see below).

I also attempted to find a good spot to fit in any useful information from other sources (see below).
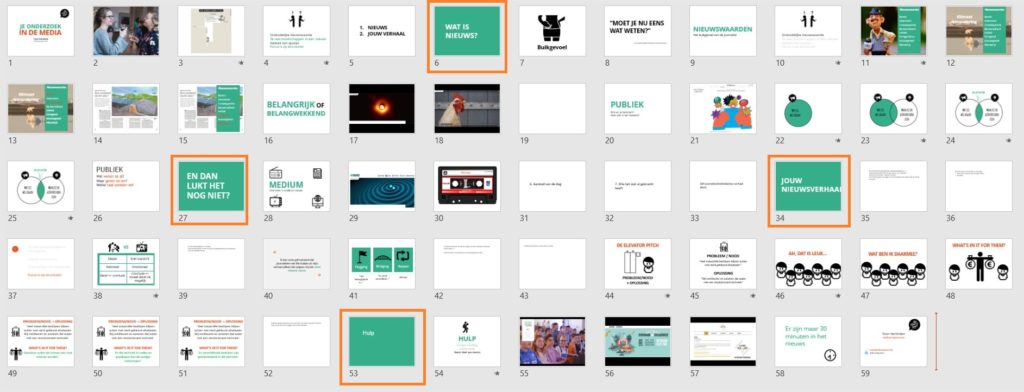
Finally, a fourth block called ‘help’ was added to the presentation, next to the three blocks mentioned in step 2. This item contains information on whom to call on for help when you are looking to appear in the media. If you read our book or have taken any of our workshops in the past, you will know that having four structure items is too much to our liking. At some point I will have to find a way to bring that number down to three.
I continue to struggle with the workshop’s intro story and add an alternative opener that I may decide to use instead. I am still undecided as to which is the most ideal opener. (spoiler: I end up not using either of the two and will look for a third option.)
After having taken these steps, you will have a fairly well-structured presentation that is filled with the most important info. Although it is no longer a rough draft, it is still far from being a finished product. Follow along in the second part of this blog post to see how we complete our presentation.